
TH 2 and 3
The Main Idea:
Army Composition -- 60% Barbarians -- 40% Archers
(Commonly called "barching")
WHY? --It's a relatively cheap army to produce, which leaves you with plenty of elixir for upgrades.
Attacking:
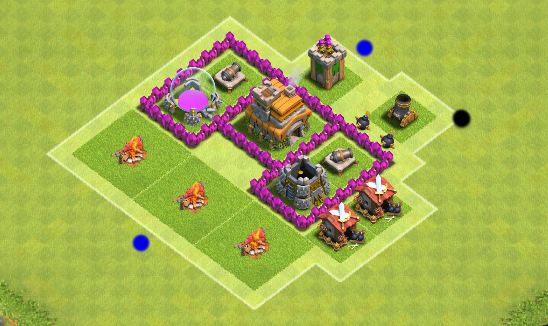
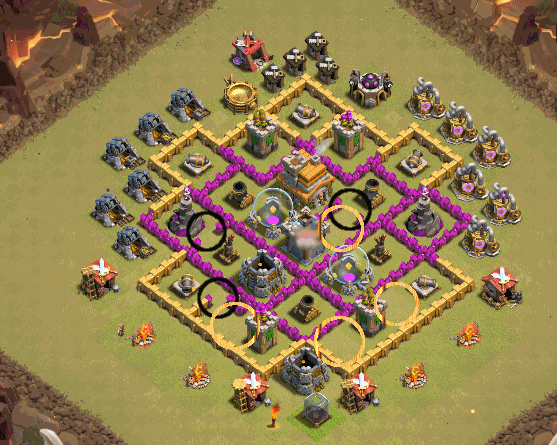
Here is a sample base. The colored dots represent where troops should be deployed.
First Wave: -- Deploy 1/2 of your barbarians by the mortar [black dot]. The mortar is the unit that will cause you the most damage, so you should take it out first. Second Wave: --Once the mortar has been destroyed, deploy the rest of the barbarians by the archer tower. --Then deploy the archers by the army camps [blue dot].
General Overall Strategy:
--Attack any exposed (not enclosed by walls) defenses. Mortars have a "dead zone" around them, which is marked by the red circle. --Use barbarians to get close to the mortar, then use archers to pick off defenses that are inside walls. (In the example, this would be the cannons). --Once all the defenses have been destroyed, your troops can easily take over the rest of the enemy village.
Note: Some players place buildings in the corners. To remedy this, I usually deploy one barbarian to that specific building, then follow through with the normal strategy.
TH 4
The Main Idea:
Army Composition: (Note: This assumes that you have your army camps completely upgraded, which means that you should have 80 housing space)
Option 1:
-- 31 Barbarians -- 20 Archers -- 5 Giants -- 2 Wall Breakers
Option 2:
-- 60% Barbarians -- 40% Archers
If you are a new TH 4, or if you haven't upgraded your army camps yet, I recommend using option 2.
Attacking:
Using Giants and Wall Breakers
The difference between attacking as a TH 4 versus a TH 2 or 3 is that you have more housing space. This means… giants and wall breakers! Now, you might be wondering: why shouldn't I use giants and wall breakers as a TH 3? Well, you do UNLOCK them at TH 3, but that doesn't mean you should use them. A good army usually has a good amount of barbarians and archers to form the second and third waves of attack, and if you use the giants then, you have to sacrifice the number of barbarians and archer that you use.
**How to Deploy Giants and Wall Breakers (First Wave) **
I recommend using giants and wall breakers as part of your first wave. Giants specifically target defenses, and you should deploy them near a mortar if it is near the outside of the base. But wait! What if the mortar is enclosed by walls? Then what? Well, that's where the wall breakers come in. The process: --Deploy giants near mortar [black dot], or whatever defense you chose. --Once the giants start attacking the walls, deploy one wall breaker. If the wall breaker doesn't break through the wall or gets killed, deploy the other wall breaker. (This is why you have two).
**WHY? **
- So why do you deploy the giants first? Well, the giants serve as a "shield" for the wall breakers. Since the defenses will target the closest troop, your giants will take the fire (it's okay, they have high hit points).
Deploying Barbarians and Archers (Second and Third Waves)
Now that the mortar and/or some other defenses have been (hopefully) taken care of, you can deploy your archers and barbarians.
- First, check to see if there are any buildings in the corners. If there are, deploy one barbarian to each of them.
- Deploy the rest of your barbarians in an arc around any buildings that aren't enclosed by walls [blue arc and blue dots]. Follow up with archers if there are A LOT of buildings (over 50% of the base).
- If you HAVE taken out the mortar, deploy your archers in CLUSTERS near the other defenses [red dot]. Archers can shot over the walls, and cannons and archer towers can only target one troop at a time.
- If you HAVEN'T taken out the mortar, deploy your archer in a LINE in front of the defenses. Since mortars deal splash damage, which is damage to all the troops in one area, a line of archers with make it so it takes longer for your troops to be wiped out.
SIDE NOTE:
Clan Castle Troops: How To Deal With Them
So how 'bout them clan castle troops?
Sometimes when you're attacking, you come across troops in the clan castle that defend your enemy's village. The troops often come out and wreak havoc on your army - oh no! Here's how to combat that:
Option 1: --Set one troop down (barbarians work well) by the clan castle. If there are troops in the clan castle, they will come out and attack your barbarian. (If there aren't any, proceed with your normal attack plan.) --Next, lure the clan troops away from the base by deploying barbarians farther away from the base. --Once all the clan castle troops are out of the range of the defenses, surround them with barbarians. NOTE: if there are air troops, for example, balloons, you will need to deploy archers instead of barbarians.
Option 2: --If you are TH 5 or above, you have another choice. --The first step is the same: use a barbarian to figure out if there are troops inside the clan castle. --Then, drop a lightning spell (unlocked with level 1 spell factory) on the clan castle troops. This should take out most, if not all of them. If any troops remain, use barbarians to take care of them.
TH 5
The Main Idea:
Army Composition:
Note: This assumes that you have the maximum army size (135 housing space).
Option 1: -- 60% Barbarians -- 40% Archers
Option 2: -- 54 Barbarians -- 40 Archers -- 7 Giants -- 3 Wall Breakers
If you are trying to get loot or trophies, I recommend using option one. If you are attacking in a clan war, or aren't going for loot or trophies, I recommend using option two.
Attacking:
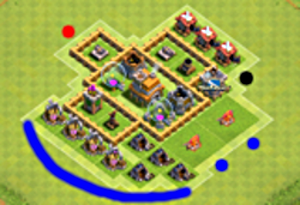
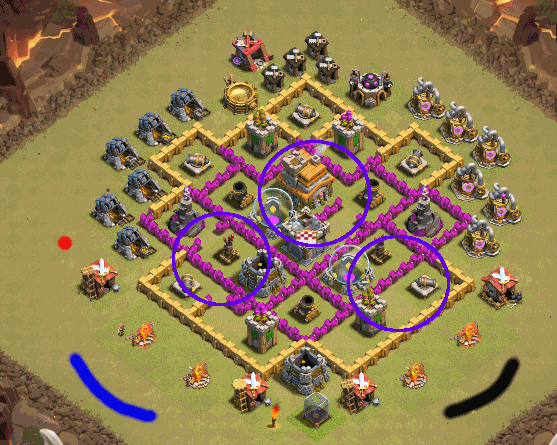
First Wave: --Deploy your giants, then wall breakers as close to the mortar as you can get [black dot]. Since wall breakers will attack the nearest enclosed wall [shown by black arrows], make sure that you don't deploy all of them at the same time.
Second Wave: -- Deploy your archers along the elixir collectors and army camps [blue arcs]. --Back up your archer attack with about seven barbarians to each side.
Third Wave: -- Split your remaining barbarians between the clan castle and army barracks and the gold mines [red dots].
Additional strategies / notes:
--Attacking enclosed defenses (i.e. mortars, archer towers, cannons, etc.) --If it is on the first layer of the base (by this I mean that it is on the outside, but enclosed by walls), use the giant / wall breaker deployment strategy outlined in the TH 4 section. -- If it is on the second+ layer of the base, you have two options. --Use the giant / wall breaker strategy -- Use a lightning spell first (this can damage a mortar to 1/2 or 3/4 of its hit points), then follow up with your giants and wall breakers.
Spells:
-- At TH 5, you unlock the lightning spell. My thoughts on it:
--I'm not really a huge fan, unless it involves zapping clan castle troops. WHY? --It cost a bit of elixir, and it doesn't really do enough damage to be "worth it" for me. I do know that some people really like to use lightning spells, especially at lower levels. If you use them, I recommend saving them for clan wars. They help to give that little bit of extra damage you need to get more stars on an attack.
TH 6
The Main Idea:
Army Composition: Note: This assumes that you have the maximum army size (150 housing space).
Option 1: -- 60% Barbarians -- 40% Archers
Option 2:
-- 40 Archers -- 18 Giants -- 1 Healer -- 3 Wall Breakers --(2 Healing Spells) OR (1 Lightning Spell and 1 Healing Spell)
Note: Spells are optional. I recommend using them in clan wars and when you find a really well-stocked base.
If you are trying to get loot or trophies, I recommend using option one. If you are attacking in a clan war, or trying to 3-star a base, I recommend using option two.
Attacking:
Alright. Attacking is going to get a bit more complicated.
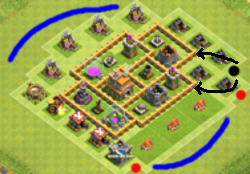
First Wave: --If I was actually attacking this base, I (obviously) wouldn't be able to see all the traps. However, since I can guess that the exposed cannon and archer tower will be guarded somehow, I can just deploy 1-3 barbarians by those two defenses [black dots] to set off any traps.
--Deploy 10 archers by the exposed archer tower. --Deploy 1 archer to each builder's hut if they are in the corners.
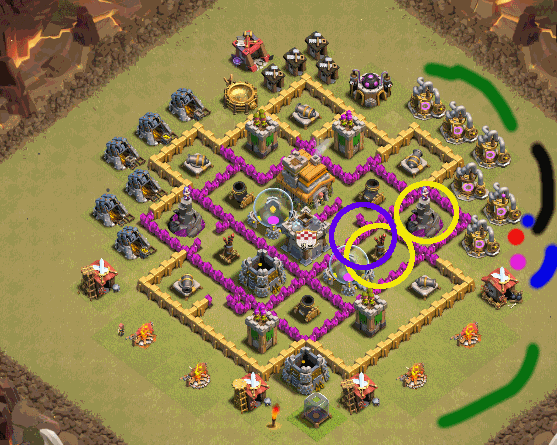
**Second Wave: ** -- Deploy 2 giants near the mortar [blue dot]. Once they start to attack the wall, deploy 1-2 wall breakers as needed. When the wall has been broken, deploy two more giants. -- (If you have healing spells and want to use them, use one now to keep your giants from getting damaged by nearby defenses). --Deploy 10 archers along each blue line. They should be more or less out of the range of the defenses (at least at first) and you'll be able to get some resources. --Deploy 10 archers near the air defense [black dot]. If needed, deploy a couple of giants as a "meat shield" Once the air defense has been taken out, deploy your healer.
Third Wave: -- Deploy 2 giants by the remaining mortar [red dot]. Once they start to attack the wall, deploy 1-2 wall breakers (depending on how many you have left). Once the wall has been broken, deploy the rest of your giants.
Fourth Wave: --Deploy the rest of your archers along each green line. Note:if your troops have already destroyed all of the elixir collectors,deploy your archers around any exposed defenses (example: the cannon), around any buildings that are out of range of the defenses,or near any defenses whose surrounding walls have been broken down.
Clan War Pro Tips:
--Make sure to lure and trap the clan castle troops before starting your giant-healer attack. Using a lightning spell is a great way to save some of your archers for later.
--Make sure to bring spells with you! A healing spell can make the difference between a 1 star attack and a 3 star attack.
--Have clan castle troops with you. Clan castle troops are a great way to have some extra oomph in your attack. For giant-healer, I suggest having your clan mates give you either hogs level 4+, high level giants, or a healer. Archers and wizards are helpful as well, but hogs are really the best option since they will jump over walls to target defenses.
TH 7
The Main Idea:
Army Composition: Note: This assumes you have the maximum army size (200 housing space)
Option One: --60% Barbarians -- 40% Archers (Barbarian King)
Option Two: -- 95 Barbarians -- 55 Archers --45 Goblins (Barbarian King)
Option Three: ---50 Barbarians -- 44 Archers -- 12 Giants -- 1 Healer -- 6 Wall Breakers -- 1 Dragon -- (Barbarian King) --(2 Healing Spells) --(1 Rage Spell)
Option Four: --10 Dragons --(Barbarian King) --(3 Rage Spells)
If you want to get loot, I recommend using option one (barch), or option two (gobarch). What I really like about option two is that if there are collectors surrounded by other buildings, but not enclosed by walls, the goblins will go straight for the loot whereas barbarians and archers will just attack the nearest building. For clan wars, I recommend using option four, especially if you want to get 6 stars total. Yes, it's expensive. Yes, anyone can do a mass dragon attack. But, the thing is, it's totally worth it when your clan wins.
Attacking:
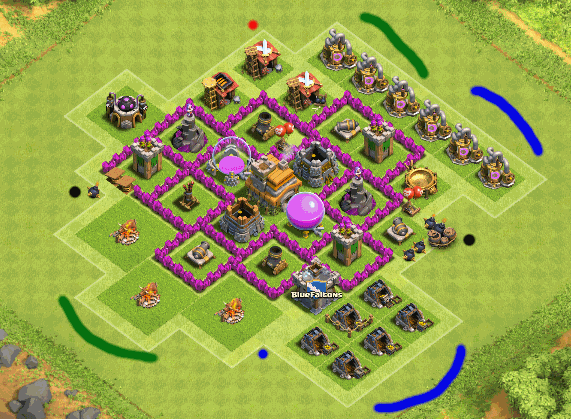
Usually, I show the example base with all the traps, but now that you're onto TH 7, it's time to up the ante. Here's a picture of the sample TH 7 base.
Okay, so here are a couple of observations. In black, I circled the places where there are most likely to be spring traps. If you use mass dragons, this won't be a problem, but if you use option three, then you'll have to keep those in mind. In gold, I circled the places where there might be a giant bomb or a hidden tesla. You can't be entirely sure which is which, or if our opponent is just trying to mess with us.
Okay, on to the actual attack.
First, I'm going to show option four, the mass dragon attack. TH 7 can have level 2 dragons, and with a mass dragon attack (especally if you have a high level dragon in your clan castle), you can defeat most TH 7s and some weak TH 8s.
 First Wave:
-- When you do all-dragon attacks, you DON'T need to lure the clan castle. What you want to focus on is taking out an air defense.
--Deploy 2 or so dragons along the black curve. They should be out of range of the air defense, and once they take out the peripheral buildings (the army camps), deploy two more dragons. They should move onto attack the archer tower and cannon. At this point, they are exposed to the air defense.
--Drop a rage spell along the purple outline closest to the black line. This should give the dragons the extra "oomph" they need to destroy the air defense.
First Wave:
-- When you do all-dragon attacks, you DON'T need to lure the clan castle. What you want to focus on is taking out an air defense.
--Deploy 2 or so dragons along the black curve. They should be out of range of the air defense, and once they take out the peripheral buildings (the army camps), deploy two more dragons. They should move onto attack the archer tower and cannon. At this point, they are exposed to the air defense.
--Drop a rage spell along the purple outline closest to the black line. This should give the dragons the extra "oomph" they need to destroy the air defense.
Second Wave: --Follow the same strategy as the first wave, only along the blue line. --Drop a rage spell along the purple outline closest to the blue line. This should give the dragons the extra "oomph" they need to destroy the air defense. --If everything goes well, and dragon AI co-operates, you should end up with both air defenses destroyed.
Third Wave: --You should start this wave at the same time you drop the rage spell in the second step of the second wave. -- Drop the Barbarian King on the red dot. He will (hopefully) distract the wizard tower from your dragons, and destroy some of the peripheral buildings.
Fourth Wave: --Deploy any remaining dragons as needed. As a note, you can deploy some of these earlier if your dragons need more support while destroying an air defense.
Okay, so here we have the same sample base.
First Wave: --Deploy 5-10 archers along the black curve. The clan castle is hard to lure in this one, so we're going to have to sacrifice a giant.
Second Wave: --Deploy 1 giant on the blue dot. Since he'll go straight for the wizard tower, he should lure the clan castle troops. --Deploy ~10 archers and ~10 barbarians on the blue curve (or a little further out of range) in order to lure and take care of the clan castle troops.
Third Wave: --Deploy 4 giants on the red dot. Once they start attacking the wall, deploy 2 wall breakers. --Deploy the rest of your giants on the red dot once the wall has been broken. --Drop a healing spell once your giants start attacking the wizard tower.
Fourth Wave: --Drop 2-3 wall breakers on the red dot. If you're lucky, some of them will go inside the base to break open the compartment that the air defense is in. --Drop another healing spell to protect your giants. --Drop a rage spell IF your giants are struggling to take out the air defense. If they are doing okay, save it for later when you need some extra "oomph".
Fifth Wave: --Deploy the rest of your barbarians and archers along the green curved lines. Split them up evenly and have a mix of barbarians and archers along each line.
Sixth Wave: --Deploy your healer, Barbarian King, and your dragon on the pink dot. Cross your fingers and hope for the best!
TH 8
The Main Idea:
Army Composition: Note: This assumes you have the maximum army size (200 housing space)
Farming Strategies:**
Option One: --60% Barbarians -- 40% Archers (Barbarian King)
Option Two: -- 95 Barbarians -- 55 Archers --45 Goblins (Barbarian King)
Option One: [MASS DRAGONS] --10 dragons --Barbarian King -- +1 drag in clan castle and 5 archers or a balloon --All rage or 2 rage/1 heal
A note on spells: Some people prefer to use three lightning spells to take out one of the air defenses. While this strategy works well at TH 7, you can sometimes run into problems at TH 8.
Option Two: [DRAGLOON] --10 dragons --Barbarian King --Max loons in clan castle --All rage or 2 rage/1 heal
Couple of side notes -- don't use all lightning spells with dragloon. The troops tend to lose momentum / get chewed up by the AD. Another note on the army comp is that you can substitute one of the drags for four loons. I don't usually do this, but if that's what you want to do, that's okay. Just make sure your loons are level 5.
Option Three: [HOGS] -- 33 hogs --25 archers --Barbarian King --3 heal spells --Hogs 4+ in clan castle
Note: It's really important to lure and kill clan castle troops for this attack. Poison spells work nicely to help take out lower hitpoint troops, and archers finish the job. Another note: Don't use this strategy unless you have level 4 hogs.
Option Four: [GoWiPe] --3 golums --1 P.E.K.K.A. --13 wizards --5 wall breakers --23 archers --Barbarian King --1 rage/2 heal --P.E.K.K.A in clan castle
Note: While I have 3 starred bases with this strategy, GoWiPe is traditionally a 2 star strategy.
Attacking:
Mass Dragons:
and


